Our marketing associate had fun challenging our products in the 2020 summer! ✨🥰
As a new homeowner with a head full of projects, she has a strong desire to personalize her new haven 🏡🏡🏡. We will follow her in her projects throughout the summer. 🌞 She will be making chronicles and send feedback on her experiences. There is nothing like getting into the swing of things to explain how a product works step-by-step.
Follow our chronicles in order to see the transformation of her wood porchs from start to finish.
This past summer I launched the ”MARJO RENOV” project on EVO HOME FINISHING’s social media with the update of my galleries. I really enjoyed the whole experience and I must confess, I was overwhelmed on a few “self-home small projects”.
If you have NO idea what the MARJO RENOV capsules are, I highly recommend you to check them out. Not to brag, but they are really entertaining.
I love what is recycled, and I must admit that I particularly like the look of natural wood. Our house has two pellet stoves, and we had to buy several pellet bags to keep us warm in winter. So we had a few wooden pallets lying around in the shed and a lot of projects in mind!
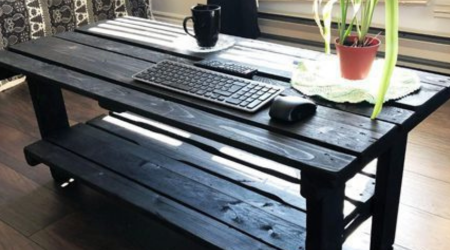
My boyfriend is my accomplice, so he made me a beautiful coffee table out of pallet wood. He even took advantage of the fact that I was going to have to oil it, so I could blog about it! It was great teamwork.
HOW TO OIL A PALLET WOOD TABLE!
HOW TO OIL PALLET WOOD WITH LIGNA® PRONTO
I must say that of all the colours available with PRONTO, I immediately fell in love with EBONY. Black is very glamorous and timeless. The oil is not opaque and the pigmentation marries with the colour of the wood, resulting in a black with a very dark brown tone. A beautiful warm hue for winter evenings.
First I covered my floor with a large plastic sheet since I was working in my living room. Oil is much more liquid than paint and usually, you need to have a solvent nearby for small spills. Have I mentioned that I’m clumsy? No? I’m no stranger to messes.
My boyfriend made me a beautiful coffee table in the afternoon!
Use protection before you begin!
PRONTO EBONY 🙂
I chose to apply PRONTO with a brush and an applicator pad. The brush is easier to get between the cracks and through the many holes of the wood. The pad is great for flat surfaces, and it doesn’t leave too much oil on the area. Always remember, an oil that dries on the surface remains sticky !!!
I sanded with 120 grit to open the wood grain. Unlike paint which sits on the surface, the oil must penetrate deep into the wood. That’s why you have to sand before applying oil. Wood from pallets is more rougher and irregular, which gives a beautiful rustic effect! However, you must be careful to sand carefully to eliminate the risk of splinters.
We sand thoroughly at 120 before oiling!
We fill the holes with the edge of the brush!
We begin with the underside of the furniture so that it can dry on its legs!
Applying oil with a brush is not the cheapest way to apply the PRONTO. It leaves more oil on the surface than the wood can absorb, so there’s a bit more waste when wiping it off. This isn’t so bad for small projects, but it’s often better to apply with an applicator pad when possible.
After waiting a few minutes, as recommended on the label, I wiped off the excess product on the surface with a white cotton cloth. If you leave the excess product on the surface without wiping it off, it is likely to remain sticky. A sticky tabletop is unpleasant to the touch.
After doing both sides (I started with the underside of the table for practical reasons), I waited the required time before using my table, a minimum of 9 hours. Do not place hot cups directly on the surface and avoid anything that is damp or wet. I recommend that you read the product webpage for all the maintenance instructions. In Marjo’s words, LIGNA’s web pages are ”on the mark”.
This table used a little more than a 237 mL can. Since the brush application caught me short, I had to buy an extra container. I didn’t have it at home, so I rushed to the store to get a second one! Okay, I was fast on my feet here, but there are no apparent overlap marks at all.
So, what to do with the rest of the container? My boyfriend made me some window tablets just so I could put some fresh greenery in my kitchen. Here are some pictures!
I most likely would have found a very nice and cheap piece of furniture for my living room on used product sales platforms, but I really wanted to have something unique and rustic.
Now I look at my table and can say that I am really glad. It is far from perfect, but in my opinion, there is a certain amount of perfection in any imperfection. That’s what makes me love it even more.
As promised in STEP-03, here are some mishaps that still end on a nice note, the result!
HYBRI-DECK is much more liquid than its congeners from the LIGNA® range. With my beautiful clumsiness, it splashed to perfection! Although I had made sure I had boxes and towels to protect the surface as you can see in the picture. Fortunately, I reacted quickly and the stains completely disappeared.
Here are a few troublesome droplets.
I forgot to cover my front base for my first porch.
On s’est repris pour la deuxième
I was so anxious to see the final results that I forgot to protect my white railing! Resulting in many brown splash marks. Lesson learned! I made sure to be better prepared before applying the second coat. You can see this in the video. My boyfriend thought of protecting the white railing with rags. I will cheer to that!
The product tends to separate as the pigments are heavier. You must have a stick handy to stir often while using the product. For my part, I used a beautiful Lilac branch as I had nothing else at the time! And NO… my porch does not smell flowery.
Yes… I did forget to oil the stairs. haha
A large, unfolded cardboard box is quite useful when moving all the tools during application.
I ran out of product! I protected my wood with tape to avoid overlapping when I start again tomorrow.
When my boyfriend and I started attacking the back patio, I had asked him to remove the stairs, so we can sand them separately… The next day, we came to realize that we had forgotten them in a corner!
So this is the end of my Renovation Steps for my porches. I did not oil my pool deck this year as we have too many uncertainties regarding a few repairs. I am very happy with the result of our work, although there are a few small imperfections.
Front Porch
Magnificent
Perfect for bird watching
What I wanted to transfer to you through my capsules is that if you don’t try for fear of making mistakes, then you will accomplish nothing. Surround yourself with people who advise you. You will see that your projects will be more and more beautiful and bigger and bigger! But dare to do… jump in! I did…
Side Porch
We look forward to seeing you again for other capsule projects, MARJO RENOV!
The day to apply the finishing product to my decks had arrived. I had the choice between two different products: EXTERIA or HYBRI-DECK by LIGNA®. These are two great quality products with good advantages. You can read the links below for more detailed information. After evaluating my needs, I opted for HYBRI-DECK.
I wanted to experiment applying this water-based oil over a large area. Water-based products can create overlaps if applied incorrectly. In other words, a darker colour can result if you return to a previous spot and apply fresh product. But no worries, it IS possible to have an even colour with a hybrid oil product as explained in the following statements.
To apply the product, I chose a 4-inch A. RICHARD SYNTHETIC STAIN BRUSH. These brushes are great! The handle unscrews, and you can replace it with a longer one. You can therefore work standing up. I was advised to choose the 4-inch width since my porch planks are 4 inches. Great advice, isn’t it?
Before starting with HYBRI-DECK, it is important to have an application plan. Let me explain; the product dries super quick. You have a waiting period between coats of 20 to 30 minutes at most. It’s great because your project can be completed in one day. But at a certain point, I had to be patient because the length of my arms didn’t allow me to continue any further without having to step on my fresh application to make my second coat. Hey, when the ice cubes in your Sangria don’t have time to melt before your next sip!
Overlap Marks
Do not cut across your boards.
Following the boards helps to avoid possible overlaps.
To avoid creating the famous overlap marks, you must work in the direction of the board, one board at a time. Honestly, you must have a good work method! My boyfriend and I worked as a team; I was on the porch while he was applying under the railing as well as the front boards. He was literally … at my feet!! hahaha.
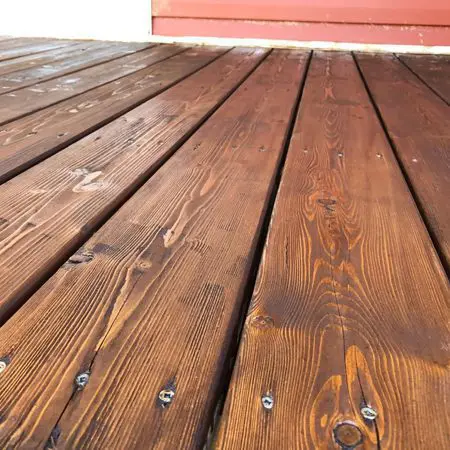
During application, the wood must be soaked, without leaving any product on the surface. I repeat because this information is very important, we soak and we spread. Therefore, the overlap marks will be almost zero or even nonexistent. After the first two boards, I had already mastered the technique. You must work the product only when wet (wet product/soaked wood). It is especially important that you make sure that all the product soaked into the wood leaving no product to dry on the surface. It is designed to protect IN the wood rather than ON the wood. I especially did not want the product to peel off like paint does.
First application
Second coat
After 6 hours
A wet product is never the same colour as a dry product. It changes as it dries. After a few hours, the colour was like my sample and I was relieved. That is why it is important to do colour testing before starting a project. I would say the surface takes on its true colour a good month after applying the product. I chose Brandy because I wanted to match the red of my house. I love it! Plus, it even sounds great! Having a Brandy on Marjorie’s Balcony!
No overlap marks!
I do so love Brandy.
Even though my porch project is finished; I do have another step! STEP 4: THE RESULT
I found it as funny as it was instructive to be able to share my mishaps because as we all know, no one is perfect! I also have some pictures of the final result from my three porches and I can’t wait to share them with you.
Another beautiful sunny day as I point my nose out the window. It was warmer than the previous day! A super pleasant temperature for working outside. June is a perfect month to do outdoor work.
As I mentioned in my last step which dealt with stripping, I could not rent a professional sandblasting machine due to the Covid context at the beginning of June. I, therefore, went to buy an orbital sander.
I was super happy and was anxious to start sanding. I took the advice of my colleagues and chose SIAFAST ABRASIVE DISCS reinforced with ceramic to do the job. They are a little more expensive than a regular brand, but because they are more durable, the expense is well worth the cost. The process was easier but long since I had decided to do two porches at the same time.
SIAFAST 5” ABRASIVE DISCS Ceramic reinforced
It’s nice to see the difference. 😀
After a few hours of work, we finished the first porch. We had to remove all the paint residues on the wood for the finished product to permeate well. However, I hadn’t realized that my sandblaster diameter would be too big for stairs. Result, I had to sand by hand and I admit that my arm is slower than a DeWalt!
My boyfriend and I relayed the work. I probably should have borrowed a second sandblaster for more efficiency.
All we have left to sand are the stair risers!
We had three porches to sand!
We were quite proud of the results!
When the sanding was all done, it was time for dinner. I placed towels on the wood for a trail to indoors. Why? The pores of the wood must be open for the finishing product to permeate well and when you walk on it with damp or wet feet, it closes them. Having nice traces of permanent footprints on your front porch is not what we were looking for, and we didn’t want to take the risk of having to sand it again.
I had thought of the yellow rope to prevent my son to climb up on the porch, but I didn’t think of knee pads for sanding. No one is perfect! Lesson learned.